BONSAI TABLE
of
Seppenhofer
 I was always amazed that at demonstrations and in bonsai magazines tilting always improvised with wedges and beer crates had to be overcome. I thought about it and then I built the following construction which can be easily produced by any hobbyists themselves.
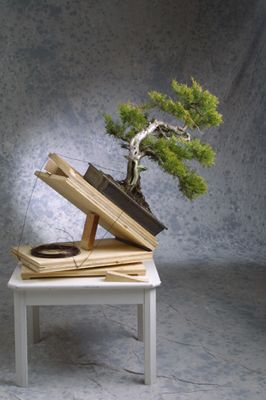
 mounted on a turntable I 3 wood boards with hinges so that it can be tilted in 3 different directions. The 4th Tilt direction is achieved by turning the adjuster.
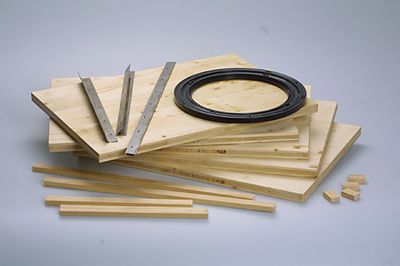
ball bearing swivel elements you get in the hardware department of a hardware store.
5 table glued panels can be tailored to the hardware store in the desired size and does the same with a piece of lath. From this you cut down 4 small pieces and attached them as feet with a little glue and a nail or small recessed screws on the bottom of the first panel. On the top board is mounted in the same manner 4 strips, as shown in the photo, that the bonsai pot by tilting can slip off. leaves at the corners is a gap to allow water or dirt can be removed easily.
grind Now you all the edges with fine sandpaper or the like from time lackert all. After drying, again grinds all surfaces and edges smooth and painted a second time Now it can go to the assembly!
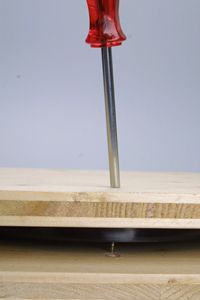
 We fixed the time being only 2 screws with the rotary member. It is important to assemble all this centered, otherwise the plate wobbles when turning. Then you drill through one of the holes of the rotary member for the board against a hole, replaced the swivel down again in order to extend the drilled hole with a large drill bit, so that the screws for can push through the counter board, together with the screw head slightly. We again attached the rotary member with the screw holes in the previous spins and then into the remaining screws.
Now you screw the board to counter and sticks to the first screw through the expanded hole, plugged into the next bolt and screw in so the can turn all the screws through the same hole. So that the turntable is ready.
 now on the narrow side of the 3rd Wood panel, the hinge mounted. I use this a so-called piano hinge, which can be cut in each of suitable length and that 2-3 mm shorter than the board. (Of course, there may be another hinge.) It is appropriate that to sink as shown in the photo, with a plane or a router, which indeed have many Bonsaianer. Who do technically is not in a position to have to put on the opposite side to compensate a bit thin strip of wood, plastic or cardboard. If you do the milling prior to painting, and this place is mitlackiert. Now we screw the hinge of the 3rd Board on the turntable. Now comes the 2nd Hinge on the other narrow side between the third and fourth board and then the third between the long side of the fourth and fifth board.
  Finally, we turn now to three Sides a wooden or metal button on the third, fourth or fifth board (see photo) so you can lift the Kippteller depending on demand, in order to define a wedge.
 This is the turning and Sepp HOFER Kippteller done. Those seeking extreme but Kippgestaltungen (over 45 degrees) may, in the second board, as shown in the detail photo, screw a few screws, where you can mount the dish with bonsai wire.
 by the company Wolfcraft there is a practical DIY dolly. The role can be removed with a screw. If you get a connection for the bonsai table does make, or have it, you have a stable folding, quickly adjustable in height stand.
 by the company Wolfcraft there is a practical DIY dolly. The role can be removed with a screw. If you get a connection for the bonsai table does make, or have it, you have a stable folding, quickly adjustable in height stand.
 Seppenhofer
Bonsai Club Tirol

0 comments:
Post a Comment